Fun activities for kids and families all year long
Menu
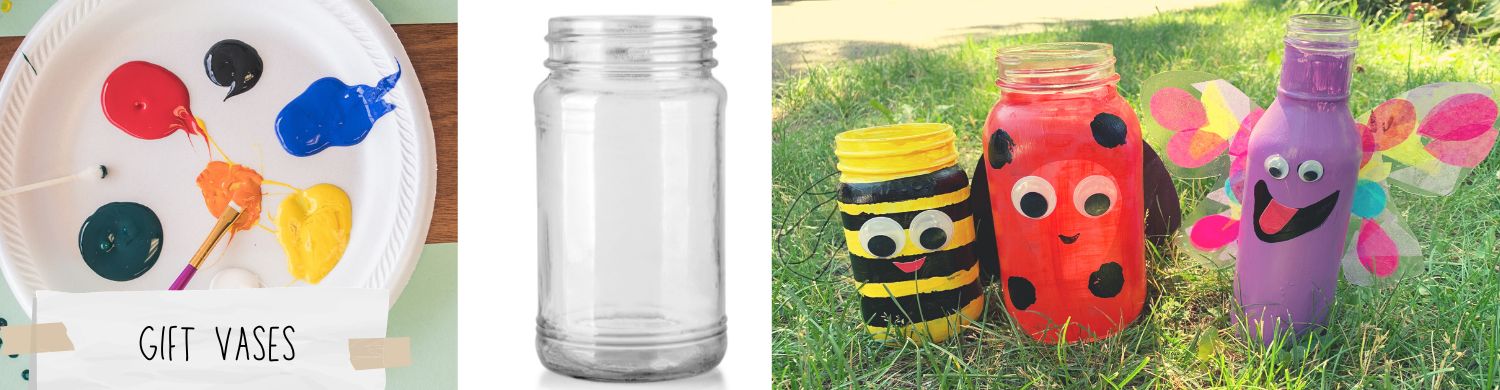
Homemade spring bug-themed vase
A homemade spring vase makes a perfect gift for Mother’s Day or for an end-0f-year teacher gift. The vases are inspired by bugs and make use of a recycled glass jar.
Homemade spring vase inspired by bugs
If you’re looking for a fun spring or summer gift that kids can make, these bug-themed vases are easy to make and require only a few supplies. We made bumble bee, ladybug and butterfly vases, but you can use your creativity to make any insect type that you like.
To make this craft you’ll need:
a recycled glass jar
acrylic paint and brushes
google eyes
other recycled food packaging (for the wings and bug details)
a glue gun or strong white glue
Mod Podge or a paint sealer
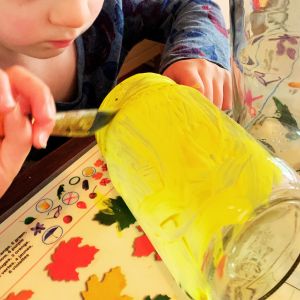
Step one: Paint the outside of your jar
For some painted jar crafts, you pour paint into the jar to color it; however, for these homemade spring vases, it’s important that you paint the outside of the jar, because inside will hold the water for the flowers.
Using an acrylic paint color that work best for your bug creation, paint a recycled glass jar with a thin layer of paint. You’ll need to add several coats of paint to achieve an opaque finish. Several thin coats of paint will achieve a smoother finish than thick coats of paint. Also, always let your paint dry fully between each coat.
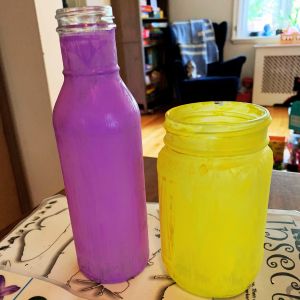
Step two: Add the insect details
Once you have the base layer of paint for your homemade spring vase, you’re ready to paint on the insect’s details like the mouth, spots, stripes, etc. You might need to add multiple layers of paint for these details. While the paint layers are drying, you can help your child make the other details you’ll add to make your bug vase look even cuter.
Making bug wings
Leftover plastic food containers make excellent, transparent bug wings. First, draw and cut out the shape of wings that you’d like. Then add details to the wings. For the bumble bee vase, we used a black permanent marker to draw details on the wings. For the butterfly vase, we drew and cut out the wings from a recycled plastic food container. We made the wings on our homemade spring vase more colorful by using Mod Podge to glue tissue paper pieces to the plastic. The wings look like beautiful sun catchers when light shines through them.
For other types of bugs, like the ladybug, you can use recycled cardboard and paint it the color that you need using acrylic paint.
Finally, to adhere the wings and the google eyes, it’s best to use a glue gun or a strong white glue to ensure that they will stay attached to the jar. If you have Mod Podge or another paint sealer, add a couple of coats to the vase. This will ensure that the paint finish lasts for a long time and stop the paint from chipping off of your vase.
Learning about insects
Making these bug inspired gift vases is a great opportunity to learn more about insects. In recent years, we’ve realized just how important these creatures are to our ecosystem. Here are some bug-inspired learning ideas:
Head to your local library and check out some insect books
Most importantly, spend some time in nature exploring bugs in their habitats. Children are naturally curious about these tiny creatures. Spending time observing in nature is both educational and promotes wellbeing.
Enjoy crafting and learning!
4 Responses
I’m going to do this project with my kiddos this spring! I love it! We can lay them around the garden.
We use cookies on our website to give you the most relevant experience by remembering your preferences and repeat visits. By clicking “Accept All”, you consent to the use of ALL the cookies. However, you may visit "Cookie Settings" to provide a controlled consent.
This website uses cookies to improve your experience while you navigate through the website. Out of these, the cookies that are categorized as necessary are stored on your browser as they are essential for the working of basic functionalities of the website. We also use third-party cookies that help us analyze and understand how you use this website. These cookies will be stored in your browser only with your consent. You also have the option to opt-out of these cookies. But opting out of some of these cookies may affect your browsing experience.
Necessary cookies are absolutely essential for the website to function properly. These cookies ensure basic functionalities and security features of the website, anonymously.
Cookie
Duration
Description
cookielawinfo-checkbox-analytics
11 months
This cookie is set by GDPR Cookie Consent plugin. The cookie is used to store the user consent for the cookies in the category "Analytics".
cookielawinfo-checkbox-functional
11 months
The cookie is set by GDPR cookie consent to record the user consent for the cookies in the category "Functional".
cookielawinfo-checkbox-necessary
11 months
This cookie is set by GDPR Cookie Consent plugin. The cookies is used to store the user consent for the cookies in the category "Necessary".
cookielawinfo-checkbox-others
11 months
This cookie is set by GDPR Cookie Consent plugin. The cookie is used to store the user consent for the cookies in the category "Other.
cookielawinfo-checkbox-performance
11 months
This cookie is set by GDPR Cookie Consent plugin. The cookie is used to store the user consent for the cookies in the category "Performance".
viewed_cookie_policy
11 months
The cookie is set by the GDPR Cookie Consent plugin and is used to store whether or not user has consented to the use of cookies. It does not store any personal data.
Functional cookies help to perform certain functionalities like sharing the content of the website on social media platforms, collect feedbacks, and other third-party features.
Performance cookies are used to understand and analyze the key performance indexes of the website which helps in delivering a better user experience for the visitors.
Analytical cookies are used to understand how visitors interact with the website. These cookies help provide information on metrics the number of visitors, bounce rate, traffic source, etc.
Advertisement cookies are used to provide visitors with relevant ads and marketing campaigns. These cookies track visitors across websites and collect information to provide customized ads.


I’m going to do this project with my kiddos this spring! I love it! We can lay them around the garden.
This is fantastic! Even my older teen would love this.
Such a great idea. This is a fun way of teaching about bugs and doing this craft. Enjoyed reading 😊
Pastor Natalie (ExamineThisMoment)
Letstakeamoment.com